Private messaging - Part IV
This guide has four distinct parts:
- Part I: initial implementation
- Part II : persistent user ID
- Part III : persistent messages
- Part IV (current): scaling up
Here's where we were at the end of the 3rd part:

We will see now how we can scale to multiple Socket.IO servers, for high availability / load-balancing purposes.
Installation
Let's checkout the branch for part IV:
git checkout examples/private-messaging-part-4
Here's what you should see in the current directory:
├── babel.config.js
├── package.json
├── public
│   ├── favicon.ico
│   ├── fonts
│   │   └── Lato-Regular.ttf
│   └── index.html
├── README.md
├── server
│   ├── cluster.js (created)
│   ├── docker-compose.yml (created)
│   ├── index.js (updated)
│   ├── messageStore.js (updated)
│   ├── package.json (updated)
│   └── sessionStore.js (updated)
└── src
    ├── App.vue
    ├── components
    │   ├── Chat.vue
    │   ├── MessagePanel.vue
    │   ├── SelectUsername.vue
    │   ├── StatusIcon.vue
    │   └── User.vue
    ├── main.js
    └── socket.js
The complete diff can be found here.
Updating the server
For this last part, we need 3 additional dependencies on the server-side:
ioredis: a great Redis clientsocket.io-redis: a Socket.IO adapter based on Redis pub/sub mechanism@socket.io/sticky: a module for running Socket.IO within a Node.js cluster
We also need a Redis instance. For your convenience, a docker-compose.yml file is provided:
cd server
docker-compose up -d

npm install
npm start
This will create 4 Node.js workers, each running the same index.js file.
On the client-side, no change is needed, we will focus on the server-side here.
How it works
Creating multiple servers
When creating multiple Socket.IO servers, there are two things to do:
- you need to enable sticky-session (please see here for the complete explanation)
- you need to replace the default in-memory adapter with the Redis adapter (or another compatible adapter)
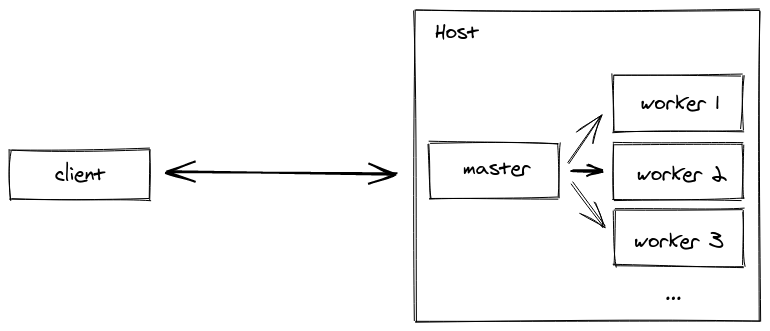
In our example, the @socket.io/sticky module is used to ensure that requests from a given client are always routed to the same Socket.IO server. This is what is called "sticky-session":
Note: we could also have created several processes listening to different ports (or used multiple hosts), and add a reverse-proxy in front of them. Enabling sticky-session for common reverse-proxy solutions like NginX or HAProxy is covered in the documentation.
The cluster is created in the server/cluster.js file:
const cluster = require("cluster");
const http = require("http");
const { setupMaster } = require("@socket.io/sticky");

const WORKERS_COUNT = 4;

if (cluster.isMaster) {
  console.log(`Master ${process.pid} is running`);

  for (let i = 0; i < WORKERS_COUNT; i++) {
    cluster.fork();
  }

  cluster.on("exit", (worker) => {
    console.log(`Worker ${worker.process.pid} died`);
    cluster.fork();
  });

  const httpServer = http.createServer();
  setupMaster(httpServer, {
    loadBalancingMethod: "least-connection", // either "random", "round-robin" or "least-connection"
  });
  const PORT = process.env.PORT || 3000;

  httpServer.listen(PORT, () =>
    console.log(`server listening at http://localhost:${PORT}`)
  );
} else {
  console.log(`Worker ${process.pid} started`);
  require("./index");
}
In our existing server/index.js file, there is a single change: the HTTP server created by the worker process does not actually listen to a given port, the requests will be handled by the master process and then forwarded to the right worker.
Before:
httpServer.listen(PORT, () =>
  console.log(`server listening at http://localhost:${PORT}`)
);
After:
setupWorker(io);
The setupWorker method provided by the @socket.io/sticky will take care of the synchronization between the master and the worker.
Sessions & messages
Now that sticky-session is enabled, we need to share sessions and messages across the Socket.IO servers.
We create a new SessionStore based on Redis. We will store each session in a Redis hash, with the HSET command:
class RedisSessionStore extends SessionStore {
  // ...
  saveSession(id, { userID, username, connected }) {
    this.redisClient
      .multi()
      .hset(`session:${id}`, "userID", userID, "username", username, "connected", connected)
      .expire(`session:${id}`, SESSION_TTL)
      .exec();
  }
  // ...
}
We also set an expiry to the key in order to clean up old sessions.
Fetching the session is quite straightforward, with the HMGET command:
const mapSession = ([userID, username, connected]) =>
  userID ? { userID, username, connected: connected === "true" } : undefined;

class RedisSessionStore extends SessionStore {
  // ...
  findSession(id) {
    return this.redisClient
      .hmget(`session:${id}`, "userID", "username", "connected")
      .then(mapSession);
  }
  // ...
}
Fetching all sessions is a bit more complex:
class RedisSessionStore extends SessionStore {
  // ...
  async findAllSessions() {
    // first, we fetch all the keys with the SCAN command
    const keys = new Set();
    let nextIndex = 0;
    do {
      const [nextIndexAsStr, results] = await this.redisClient.scan(
        nextIndex,
        "MATCH",
        "session:*",
        "COUNT",
        "100"
      );
      nextIndex = parseInt(nextIndexAsStr, 10);
      results.forEach((s) => keys.add(s));
    } while (nextIndex !== 0);

    // and then we retrieve the session details with multiple HMGET commands
    const commands = [];
    keys.forEach((key) => {
      commands.push(["hmget", key, "userID", "username", "connected"]);
    });
    return this.redisClient
      .multi(commands)
      .exec()
      .then((results) => {
        return results
          .map(([err, session]) => (err ? undefined : mapSession(session)))
          .filter((v) => !!v);
      });
  }
}
Similarly, we create a new MessageStore based on Redis. We will store all the messages linked to a given user in a Redis list, with the RPUSH command:
class RedisMessageStore extends MessageStore {
  // ...
  saveMessage(message) {
    const value = JSON.stringify(message);
    this.redisClient
      .multi()
      .rpush(`messages:${message.from}`, value)
      .rpush(`messages:${message.to}`, value)
      .expire(`messages:${message.from}`, CONVERSATION_TTL)
      .expire(`messages:${message.to}`, CONVERSATION_TTL)
      .exec();
  }
  // ...
}
Retrieving the messages is done with the LRANGE command:
class RedisMessageStore extends MessageStore {
  // ...
  findMessagesForUser(userID) {
    return this.redisClient
      .lrange(`messages:${userID}`, 0, -1)
      .then((results) => {
        return results.map((result) => JSON.parse(result));
      });
  }
}
Forwarding messages
There is one last modification that is needed: we need to make sure that messages actually reach the recipient, even if this recipient is not connected on the same Socket.IO server:
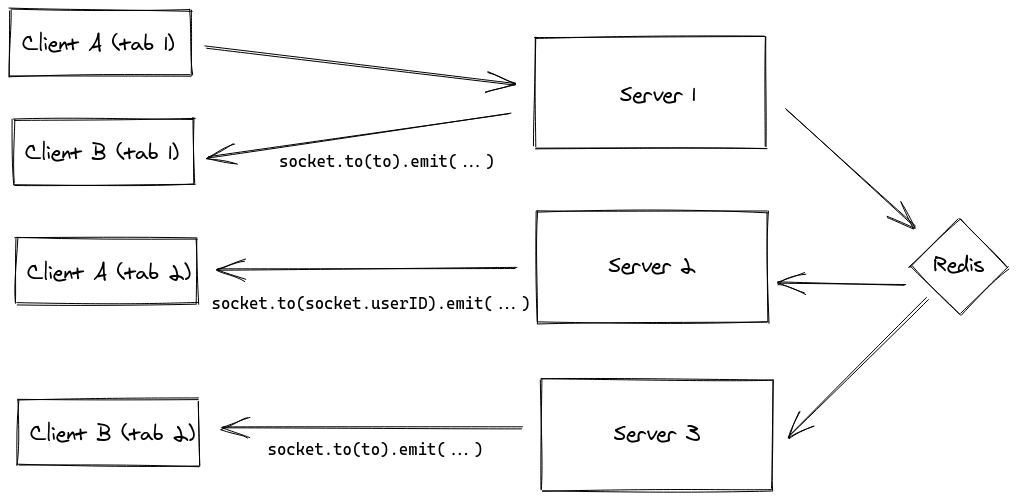
This is the duty of the Redis adapter, which relies on the Redis pub/sub mechanism to broadcast messages between the Socket.IO servers and eventually reach all clients.
const httpServer = require("http").createServer();
const Redis = require("ioredis");
const redisClient = new Redis();
const io = require("socket.io")(httpServer, {
  cors: {
    origin: "http://localhost:8080",
  },
  adapter: require("socket.io-redis")({
    pubClient: redisClient,
    subClient: redisClient.duplicate(),
  }),
});
And that's it! If you have a Redis CLI on your machine, you can check the messages that are sent on the wire:
$ redis-cli
127.0.0.1:6379> PSUBSCRIBE socket.io*
Reading messages... (press Ctrl-C to quit)
1) "psubscribe"
2) "socket.io*"
3) (integer) 1
1) "pmessage"
2) "socket.io*"
3) "socket.io#/#"
4) "\x93\xa6XFD3OF\x83..."
Documentation:
Note: with the Redis adapter, the allSockets() method which is used in the "disconnect" handler automatically returns the Socket IDs across all Socket.IO servers, so there is nothing to update.
Review
OK, so let's sum it up: we have created a fully functional chat (yes, once again!), robust, ready to scale horizontally, which allowed us to introduce some useful Socket.IO features:
- middlewares
- rooms
- scaling to multiple Socket.IO servers
Thanks for reading!